Uncategorized

Top 5 Must-Have Car Care Products to Keep Your Vehicle Looking New

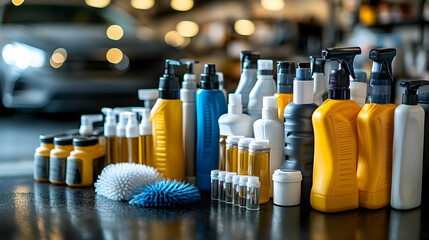
Car detailing is a specialized form of cleaning that requires the right products to keep your vehicle looking pristine. From a microfiber wash mitt to an interior brush set, these items help you get the best results from your cleaning routine.

Microfiber wash mitts are soft cloths that hold car shampoo and work it into a rich lather to avoid scratches. They also remove dirt from hard-to-reach areas like air vents.

1. Car Wash Soap

Car wash soap removes dirt, grime, and other contaminants from a vehicle’s surface, leaving it looking clean and new. Most high-quality car wash soaps are designed to produce a thick foam that clings and lifts dirt away from painted surfaces, while rinsing off easily without water spots or residue. Some are even formulated to provide hydrophobic protection, making it harder for dirt to stick.

The best car wash soaps are gentle on paint and offer a wide range of features to make cleaning easier. For instance, lubricating additives help to loosen soil and dust from the surface of the paint for easy removal with a soft sponge or wash mitt. Some are also formulated to enhance gloss and protect against UV damage.

Other features to consider include whether the car wash soap is formulated for use with a foam cannon or traditional bucket and towel washing. Some are designed to work well with both, while others perform better with one or the other. There are even options that are scented to make washing your vehicle a more enjoyable experience.

2. Microfiber Towels

A microfiber towel can be used for a variety of detailing tasks and can quickly dry a vehicle’s exterior or interior. It’s also gentle on paint and other surfaces, reducing the risk of scratching. Microfiber towels also provide superior absorbency, soaking up seven times their weight in water.

When choosing a microfiber towel, consider its GSM, which directly correlates to its thickness and absorbency. A higher GSM towel is more durable and can withstand repeated washing and use without losing its effectiveness. A lower GSM towel may be softer and plusher, but will not hold as much moisture.

Another important factor to consider is the size of the microfiber towel. A larger towel can cover more surface area and will be faster for drying large sections of a vehicle. A smaller towel is better suited for precision cleaning and accessing tight spaces. Also, look for a towel with serged edges that will prevent fraying and offer additional scratch prevention. This will increase the longevity of your microfiber towel. A mammoth microfiber towel is an excellent option, as it is large, soft, and can be washed multiple times.

3. Detailing Brushes

Detailing brushes are an essential tool for achieving outstanding cleaning results and immaculate finishes on the interior and exterior of your vehicle. These brushes help remove stubborn dirt and grime from difficult-to-reach places, including the nooks and crannies of your vehicle’s wheels, tires, and dashboard panels. They also come in multiple bristle hardnesses to match your cleaning needs, from soft to stiff.

For example, a brush made with natural boar’s hair is ideal for sensitive surfaces and painted areas because it is naturally soft and durable without leaving scratches. It’s also gentle on your car’s upholstery and carpeting, removing embedded pet hair and lifting dirt. Other brushes have a unique curved design to reach those hard-to-reach spots.

You’ll need a brush that is specifically designed for your wheel and tire surfaces, since they are constantly exposed to road debris and brake dust. Wheel detailing brushes have firm bristles that scrub away debris and grit safely, while flagged tip bristle brushes are ideal for cleaning in between spokes.

4. Tire Shine

A well-maintained car isn’t just about its engine or paint job – the tires also play an important role in keeping a vehicle looking new. Tire shine products help to give tires a glossy finish and protect them from harmful elements such as dirt, water, salt, and UV rays.

These products are available in multiple forms, including sprays, gels, and foams. Each type offers different benefits and advantages based on the customer’s needs and preferences. For example, a spray product is ideal for quick application as it requires no foam applicator and can be used on wet or dry tires. A gel-based product, on the other hand, provides a more natural-looking finish and can be applied directly to the tires with a microfiber cloth.

It’s important to note that before applying any tire shine products, the tires should be cleaned and dried thoroughly. This step is crucial as it helps to ensure that the product adheres evenly and lasts longer. Additionally, it’s a good idea to read reviews about specific products before purchasing to get an accurate idea of how effective they are.

5. All-Purpose Cleaner

All-purpose cleaners clean a wide variety of surfaces in your vehicle, including the interior. These cleaning products typically remove grease, oil, tar, wax, paint, and adhesive residues. They also eliminate dirt, mold, and mildew on nonporous surfaces. They usually contain mixtures of anionic and nonionic surfactants, polymeric phosphates, sequestering agents, solvents, hydrotropic substances, polymeric compounds, corrosion inhibitors, and skin-protective additives. Most are available in trigger spray, liquid that you dilute with water, or as wipes. Choose a product that is compatible with the surface you want to clean and test it on an inconspicuous area before use. Many cleaners have antibacterial properties that kill germs and eliminate viruses. They are often scented, but you can find unscented options as well.

Some cleaners can damage certain surfaces, so always read the instructions carefully before using.

Home Improvement

Cabinet Refinishing Vs Full Kitchen Remodel

San Jose cabinet refinishing is an eco-friendly option that gives the kitchen a fresh new look without replacing cabinets. However, it doesn’t address structural changes and offers limited style flexibility.

Replacing cabinets is undeniably invasive, turning the heart of your home into a construction zone with noise and dust. However, it delivers a brand-new kitchen and adds value to your home.

San Jose Cabinet Refinishing

Cost

If your cabinets are still structurally sound and you’re happy with the layout, refinishing is a more affordable option. It’s also a greener choice that keeps your existing cabinetry out of landfills, reducing waste and minimizing impact on the environment.

Cabinet refinishing changes only the exterior surfaces of your cabinets, leaving the cabinet boxes and interior framing intact. This allows you to transform your kitchen’s look without a full renovation. Refinishing is also an excellent option for homeowners who want to change the color of their cabinets without committing to a complete replacement. From modern, painted finishes to classic wood colors, the design options are endless.

With a minimal amount of demolition and disruption, cabinet refinishing can be completed in days instead of weeks. It’s a faster and more cost-friendly alternative to the costly, messy process of replacing your cabinets.

For a more dramatic transformation, cabinet refacing is an excellent option. This process involves changing out your cabinet doors, drawer fronts and hardware, while keeping the underlying boxes intact. It offers more customization than refinishing and the opportunity to change out your cabinet hardware to new, high-quality knobs or pulls for a completely updated look.

The most obvious difference between refinishing and replacement is the cost. A total cabinet replacement requires a much bigger investment and can cost up to ten times as much as refacing. It also requires more extensive work from contractors like plumbers and electricians, as well as a longer project timeline.

In terms of return on investment, refacing is a better choice for most homeowners. Across regions, refacing typically returns more than 50% of its cost, making it a great option for homeowners looking to increase their home’s value.

The best option for you will depend on your current needs and future goals for the space. If you have outdated appliances and a cramped layout, replacing your cabinets may be the best solution. If you’re just tired of the dark oak or light cherry, cabinet refinishing can give them a fresh, new appearance for less money and hassle.

Disruption

Cabinet refinishing breathes new life into old cabinets without the cost and hassle of replacing them. It’s the perfect solution for homeowners who are ready for a summer refresh, but still want to retain their kitchen’s existing style. Choosing the right cabinet finish is essential to achieve the results you desire, but a professional can help ensure your project goes smoothly.

Depending on the scope of your renovation, cabinet refinishing can be completed in just a few days, making it a quick and convenient update. However, this process can create significant dust and fumes during the application, so it’s important to plan ahead and make alternative dining arrangements while the crew is working.

In contrast, full kitchen replacement can take weeks and leave your space unusable. Refinishing your cabinets may seem like a simple task, but this project requires a lot of skill to complete correctly. Attempting to refinish your cabinet doors without the proper tools and experience can lead to a disastrous result and even damage your existing woodwork.

Refacing your cabinet boxes with a high-quality lacquer can protect your cabinets against common kitchen elements like heat and moisture. This will provide long-term durability that lasts 15-20 years and gives you peace of mind for the future. However, refacing isn’t the right option for structurally damaged or outdated cabinets. This upgrade works best for cabinets that are in good condition and meet your functional needs.

Both refacing and refinishing can increase your home’s value, but it’s important to weigh the benefits of each before committing to one. While refacing is a great choice for those with a longer-term investment in their kitchen, refinishing can be just as effective for cosmetic updates and maintaining a home’s resale value.

Before you decide, consider what your functional goals are and how your current cabinets fit into those plans. A full kitchen remodel is a worthwhile investment for anyone who cooks often, entertains, or has children. A full kitchen is also the perfect solution for families that grow quickly, as it adapts to changing needs with built-in solutions like pull-out drawers and lazy Susans. On the other hand, a small kitchenette may be too cramped for growing families or those who enjoy a more minimalist design.

Timeline

Cabinets make up a significant portion of your kitchen and are an expensive investment. It’s understandable that you’d want to give them a fresh new look that matches the rest of your décor. Luckily, refinishing can breathe new life into existing cabinets without the cost or hassle of a complete remodel.

Refinishing involves sanding down the cabinets and applying a stain or paint, which changes the color and overall appearance of your kitchen. The process takes much less time than a full kitchen replacement but it’s important to note that you won’t be able to access your cabinets during this time, so you may need to eat out or use the microwave and refrigerator in the next room.

If you’re looking for a quick facelift to your existing cabinets, refinishing is the best option. However, if you need a more dramatic change and are planning on selling your home in the near future, replacing your cabinets might be the better option.

A complete kitchen remodel is a major undertaking, and will require weeks of disruption. During this time, you’ll have to wash dishes in the bathroom or dine out, which can add up over a long period of time. Cabinet refinishing, on the other hand, is a much quicker project that only requires days or a week to complete.

The timelines for both projects vary depending on the complexity and size of your kitchen, as well as any repairs that need to be made prior to refinishing. A cabinet refacing company will work to minimize delays and ensure that the schedule is kept as close to expected as possible.

It’s also important to consider how long you want the results of your cabinet refinishing project to last. A refacing process uses factory-finished materials designed to resist heat, moisture, and everyday wear and tear. With proper care, a refacing project can last 15-20 years or more. By comparison, a high-quality cabinet refinishing process will hold up to regular use for 5-7 years before it needs to be refreshed. Trying to speed up the refinishing process by ignoring or skipping recommended steps can compromise the quality of your finish and cause problems in the future, so it’s important to be patient when it comes to this project.

Visual Impact

Cabinets play a crucial role in defining the overall look and feel of your kitchen. But over time, they can lose their luster and start to look scratched, dull or just dated. When that happens, some homeowners face the decision of whether to replace or refinish their cabinets. The choice isn’t as clear-cut as it seems, because both options have their pros and cons.

A full replacement of your existing cabinets requires a complete demolition and construction of new components. This can be disruptive to your everyday routine and turn one of your most important rooms into a construction zone. Refinishing, on the other hand, is less invasive. It typically involves a thorough cleaning and deglossing, light to moderate sanding or chemical stripping and then high-quality priming with acrylic or conversion-polyurethane topcoats. The turnaround for a typical 12-cabinet kitchen can run 3-7 days on-site, and upgrades like soft-close hinges and new pulls can add functionality without a major cost increase.

Regardless of how you choose to update, it’s essential that you understand the impact on your kitchen’s overall design and function. A full remodel will rework the entire layout of your kitchen and may involve plumbing and electrical changes as well. This approach will usually recoup the most value at resale, but it can also be the most expensive.

Cabinet refinishing offers a more conservative financial return, but it can offer dramatic visual results. It’s a great option for historic preservation, as well as for those looking for a temporary facelift. Refinishing only works on wood cabinets and does not address the structure of your existing cabinets, but it can change the color or stain to dramatically alter their appearance.

Refacing will change your kitchen’s overall layout, but it can work wonders for a small space that feels cramped and outdated. It can recoup 70-90% of its costs at resale, and it’s a more budget-friendly alternative to a full replacement. It’s also a great option for those who have no interest in a structural change to their kitchen. Instead, they just want a clean, updated look and a fresh take on their home’s style.

Landscaping

Rooted Perfection: A Fresh Take on Sod Installation

A thriving lawn starts with the right foundation. Sod installation is more than rolling out grass on soil. It is a science, an art, and a careful sequence of decisions that determine the beauty of outdoor spaces. The difference between a patchy yard and a lush carpet often lies in how well the sod was planned, laid, and nurtured.

Sod Installation

Most people think sod is just instant grass. Yet beneath that green layer is a living system that needs compatibility with its environment. Matching soil conditions, moisture levels, and climate factors ensures that sod roots quickly and deeply. It transforms from a fragile mat into a robust ecosystem, anchoring itself firmly in the ground. Keep reading the article below to learn more about Best Time To Lay Sod In Colorado.

Choosing the right sod is the first decision that shapes success. Each type has unique traits, from tolerance to sunlight to resistance against pests. Understanding how these traits interact with local conditions leads to better outcomes. A mismatch can mean weak growth, disease, and expensive replacements.

Preparation is where many installations fail before they begin. Soil testing may seem unnecessary, but it uncovers vital information like pH levels, nutrient availability, and drainage capacity. Adjusting these before installation sets the stage for strong root development. A well-prepared bed helps sod establish faster and stay healthier.

Clearing the site of debris, weeds, and old vegetation is essential. Left unchecked, they compete for water and nutrients, weakening the new sod. Even small roots from past growth can stunt the establishment process. A clean slate ensures the sod’s energy focuses entirely on rooting and expanding.

Grading the soil may look cosmetic, but it has functional importance. Subtle slopes guide water flow, preventing pooling that can rot roots. Proper leveling also eliminates uneven settling that leads to patchy coverage. It creates a smooth, consistent surface for sod to bond with the soil.

Moisture plays a crucial role before the sod even touches the ground. Pre-watering the soil to a balanced dampness helps roots connect instantly. Too dry, and they struggle to absorb water; too wet, and they suffocate. This delicate balance at installation time sets the pace for long-term growth.

How sod is handled during delivery and installation influences its survival. Leaving rolls in the sun or stacked too long can cause overheating and drying. Quick placement ensures roots remain alive and active. Laying sod within 24 hours of delivery significantly improves establishment rates.

The technique of laying sod matters more than most realize. Staggering seams like bricks strengthens the structure and prevents erosion. Tight seams reduce gaps where weeds could invade or soil could dry out. Overlapping edges is a common mistake that creates uneven growth patterns.

Firm contact between sod and soil is vital for root integration. Light rolling or tamping eliminates air pockets that disrupt moisture transfer. Without this step, roots may fail to anchor, leading to dieback. A snug fit ensures a continuous exchange of water and nutrients.

Watering immediately after installation is a make-or-break step. The first watering should deeply saturate the sod and underlying soil. It reduces transplant shock and triggers the rooting response. Missing this step or doing it lightly can undo all previous effort.

The watering schedule in the following weeks requires precision. Frequent, light watering encourages shallow roots, which dry out easily. Deep, less frequent watering trains roots to grow downward in search of moisture. This resilience is crucial for surviving dry spells and seasonal changes.

Traffic management during establishment often gets overlooked. Heavy foot traffic can compact the soil, restricting oxygen and water flow to roots. It can also shift sod pieces out of alignment, creating seams and bare spots. Keeping the area undisturbed for at least two weeks helps roots stabilize.

Fertilization strategies after installation differ from routine lawn care. High-phosphorus starter fertilizers support rapid root growth. However, over-fertilizing can burn tender roots or encourage excessive leaf growth over root strength. Balanced, targeted feeding ensures sustainable establishment.

Weed control during early growth must be handled carefully. Chemical treatments can stress or damage new sod. Manual removal and proper mowing practices are safer options in the first few months. Once established, the sod’s density becomes its best defense against weed invasion.

Mowing timing influences how well sod develops. Cutting too soon can pull up roots before they anchor. Waiting too long can stress the grass by blocking sunlight at the base. The first cut should be made once the sod has visibly knitted into the soil and reached the recommended height.

Post-installation maintenance shapes the lawn’s long-term health. Aeration improves oxygen and water movement through compacted layers. Overseeding in thin areas ensures consistent coverage. Seasonal adjustments in watering, mowing, and fertilizing align the sod with changing growth patterns.

Environmental factors continue to affect sod performance beyond installation. Shade patterns, wind exposure, and microclimates can influence growth rates and resilience. Observing these factors helps fine-tune care practices. Tailored maintenance plans outperform generic lawn care schedules.

Sod installation is also evolving with new sustainable practices. Some installers now incorporate organic soil amendments to boost microbial activity. These microbes improve nutrient uptake and disease resistance naturally. Such methods reduce reliance on synthetic fertilizers and chemicals.

Innovations in root stimulant treatments are changing early growth dynamics. These biological additives promote faster root branching and stronger anchorage. They also help sod adapt more quickly to challenging soils. As these products become more accessible, they are reshaping installation standards.

Moisture management technology is another frontier. Smart irrigation systems deliver water precisely when and where it’s needed. Soil moisture sensors prevent overwatering, which can lead to disease and wasted resources. Integrating these technologies makes sod installation more efficient and sustainable.

Erosion control strategies have also expanded sod’s role in landscaping. Installing sod on slopes stabilizes soil quickly, reducing runoff and sediment loss. Its dense root system binds the soil together more effectively than seed. This approach is now used for functional as well as aesthetic purposes.

Sod is increasingly part of green infrastructure planning. It contributes to stormwater management by absorbing runoff and filtering pollutants. It reduces heat buildup in urban environments by providing natural cooling. These ecological benefits extend far beyond the lawn’s edge.

The economics of sod installation are shifting too. Long-term cost savings from reduced maintenance, quicker establishment, and improved property value often outweigh initial expenses. Businesses and homeowners alike are rethinking sod as an investment rather than a luxury. This perspective drives demand for higher-quality installations.

DIY installation remains popular but comes with trade-offs. Professionals bring expertise in soil science, turf selection, and site-specific solutions. Their precision reduces risks that lead to costly repairs or replacements. However, informed DIYers can achieve excellent results with proper planning and care.

Timing sod installation strategically can enhance success. Cooler seasons with moderate rainfall support root development without excessive stress. Installing during extreme heat or cold slows growth and increases risk. Aligning installation with seasonal conditions improves establishment speed and durability.

Even with perfect technique, post-installation observation is key. Signs like uneven color, patchiness, or soft spots indicate underlying issues. Early intervention prevents minor problems from becoming major setbacks. A watchful eye ensures the sod transitions smoothly into a mature lawn.

The future of sod installation is leaning toward customization. Instead of one-size-fits-all approaches, tailored blends and techniques optimize performance for specific environments. Blends engineered for drought tolerance, shade, or heavy traffic are now more accessible. This personalization enhances results across diverse landscapes.

Incorporating biodiversity into sod systems is gaining traction. Companion plants with complementary root structures improve soil health and water retention. They also attract beneficial insects that protect against pests naturally. This integrated approach creates more resilient and sustainable lawns.

Sod installation, once seen as a simple landscaping task, has become a sophisticated field. It blends science, technology, and ecological awareness into every step. Each decision, from soil prep to maintenance, shapes how well sod thrives and how long it lasts. The result is more than a lawn — it is a living, evolving landscape.

Ultimately, sod installation is about creating a connection between nature and design. It transforms empty soil into vibrant, living ground that enhances outdoor spaces. With thoughtful preparation and ongoing care, that transformation endures for years. And as techniques evolve, so too does the potential to craft greener, healthier environments from the ground up.